Learn about the different features of Montel XLF and how they can be used.
The XLF Menu
Upon starting Microsoft Excel after installing the XLF add-in, the Montel XLF tab will be visible among the main tabs.

Clicking on one of the function buttons (“Quote”, “OHLC”, "Trades", “Spot/Index”, or “Fundamental”) opens the log-in window:

Log in with your Montel XLF credentials. Mark the "Save credentials"-box so your log in information is saved for next time.
Clicking on one of the functions buttons after you have logged in will open the Montel XLF interface.
In the Montel XLF interface, each product is listed with several symbols and related metadata. Click here for more information on how product symbols are structured.
Quote function
The Quote function provides a snapshot of the price situation of a market product for the current trading day.
Upon adding a single or several products, a table of data will appear in the spreadsheet. The data updates automatically whenever the market moves and new values are available.
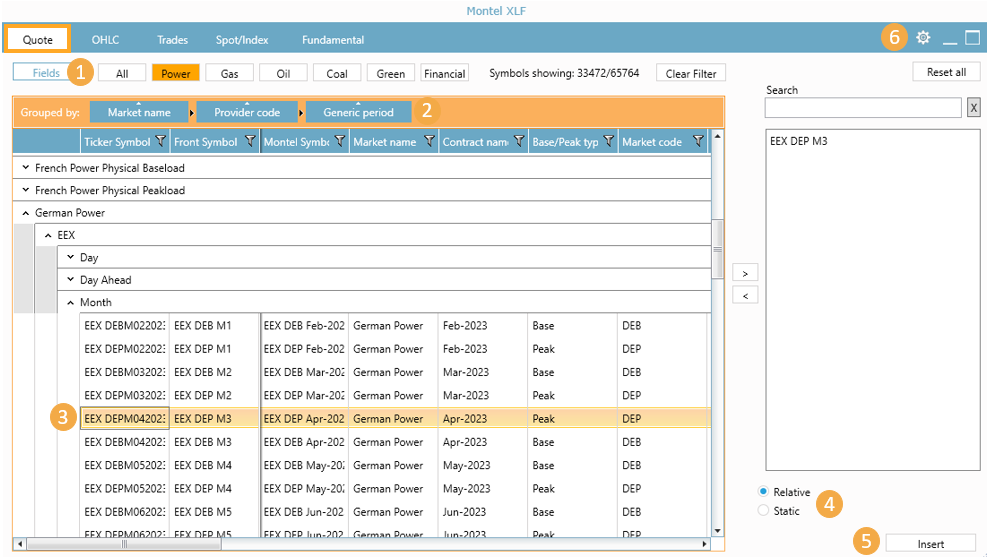
- Filter the displayed products based on one of the following commodity groups: All, Power, Gas, Oil, Coal, Green, or Financial.
- Drag and drop fields from the blue highlighted row to the orange row to add layers of filters (e.g., Market name > Provider code > Generic period, which is the default setting). To change the order that products are grouped, click and reorder the blue field names.
- Select the products that are to be inserted into the spreadsheet by double-clicking them. This moves them to the selection window on the right side of the interface.
- Choose whether the product names are to be updated at the end of the current trading period.
- Check the "Relative" box to have the product names in the spreadsheet automatically update when the current trading period has ended. This equals the function "Front+.." (e.g., CAL+1).
- Check the "Static" box to have the product period stay unchanged after the end of the current trading period (e.g., CAL22). The values will then be stored permanently.
- Click the "Insert" button to insert the chosen products into the spreadsheet. Note that this may take a few seconds depending on the amount of data that is inserted at the same time.
- Open the settings menu by clicking the gear-wheel icon in the top right of the interface. Here it is possible to individualize the personal settings. For example, it is possible to choose to view all available products or only those with high liquidity.

OHLC function
The OHLC function provides end-of-day (EoD) data for one or several specified products.
After inserting a product into the spreadsheet, a new line of data will be automatically added when the end-of-day OHLC data (Open-High-Low-Close) is available. Using the OHLC function, it is possible to set up historic data series of one or several specified products.
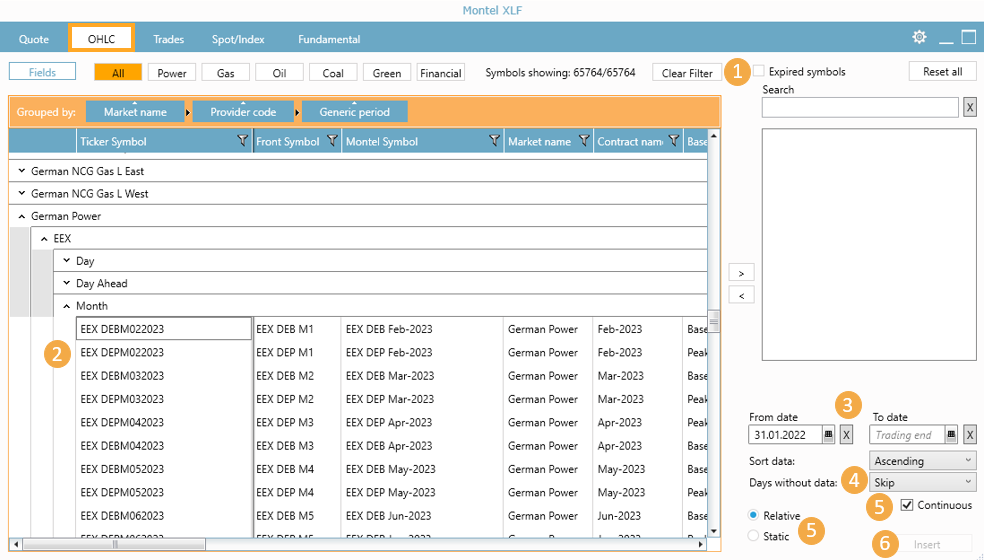
- Check the "Expired symbols" box to display expired products from previous trading periods in addition to active products.
- Select and double-click a product to add it to the selection window on the right side of the interface.
- Choose the time range for the displayed data, using "From date" and "To date". Leaving the "To date" field blank ensures that the data table is continuously updated until the last trading day.
- Click the drop-down menu next to "Days without data:" to select how cells without values will be handled.
- Skip: Only trading days with values are displayed, resulting in continuous data sets without blank rows.
- Include all: All days are displayed, including weekends and bank holidays.
- Include weekdays: All weekdays are displayed as separate rows, including bank holidays.
- Choose Relative and Continuous to show the historical development of a front symbol in the chosen interval. Choose Static and uncheck Continuous to show only the front symbol from this date forward.
- Add the chosen products to the spreadsheet by clicking the "Insert"-button.
Trades function
Adding products to the Microsoft Excel spreadsheet via the Trade function provides a list of all closed deals in the chosen time range. All trades are displayed as separate rows, adding new trades to the table automatically.
Be aware that highly liquid products, such as Brent oil, might load thousands of rows of data. This can affect the performance of the spreadsheet. To avoid this, limit the amount of displayed data.

- Double-click on the chosen product and insert it into the selection field on the right side of the interface.
- Date/count
- Select Date in the drop-down menu to choose the time range for the displayed data. Leaving the "To date:" blank keeps the spreadsheet continuously updated.
- Select Number of trades in the drop-down menu to choose the number of displayed trades. Write the number into the "Number of trades:" field.
- Click the "Insert" button to add the selected product to the spreadsheet.
Spot/Index function
The Spot/Index function provides Day-Ahead and index data. Choose different time blocks (base, peak, hourly) for a better overview.
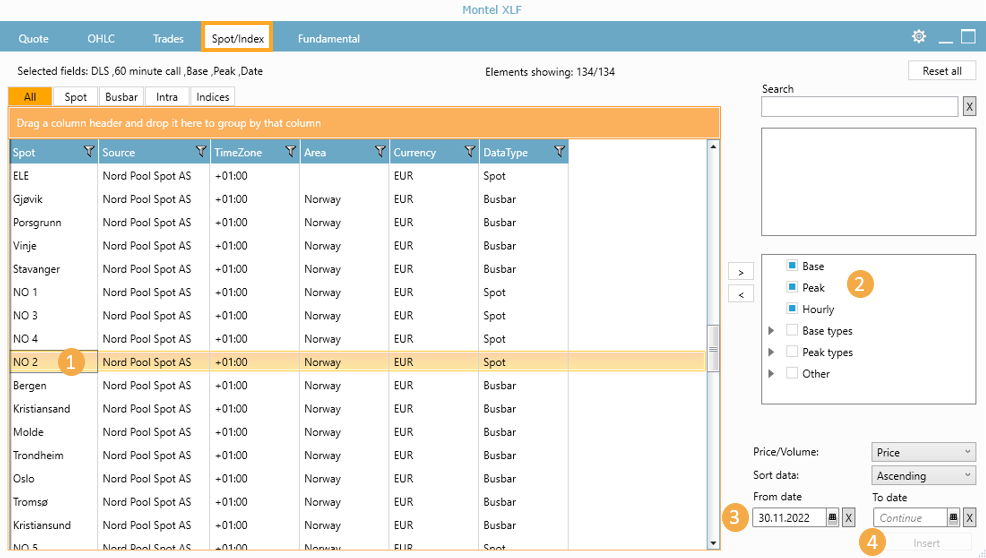
- Double-click on the chosen product to insert it into the selection field on the right side of the interface.
- Choose the time blocks that data is displayed for.
- Choose the time range for the displayed data.
- Click the "Insert" button to add the chosen product to the spreadsheet.
Fundamental function
Among the data displayed in the Fundamental function, there are production, consumption, flow, and forecast data.
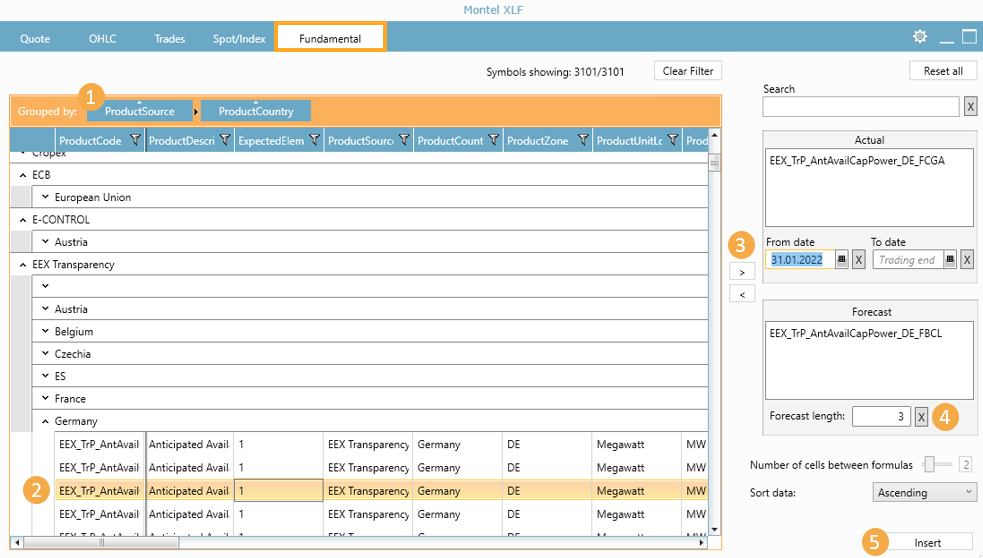
- For the best overview, drag and drop the "ProductSource" field to the leftmost position on the orange bar.
- Double-click the chosen product to insert it into the selection field on the right side of the interface.
- Right-click the product rather than double-clicking it to toggle between extracting forecast or actual data.
- Depending on the choice to extract either forecast or actual data, the chosen product will appear in one of the two selection windows on the right side of the interface.
- Edit the number of days for forecast data in the "Forecast length:" field.
- Click the "Insert" button to add the chosen product to the spreadsheet.
Edit inserted data
Inserted products can be edited at any time directly in the spreadsheet. In this example, an OHLC function of EEX French Base Power Y1 data has been added to the spreadsheet as a relative/continuous product.

- Select the product that is to be edited by clicking any of the cells connected to the displayed data to highlight it in blue.
- When a product is highlighted in the spreadsheet, the related function button in the top ribbon is also highlighted in blue. Double-click the function button to open the interface.
- Editing mode is enabled when the top bar in the interface is orange. All changes made in the interface are applied to the highlighted product in the spreadsheet.
- Click "Fields" to add, remove or sort the fields shown in the spreadsheet.
- The product that is currently being edited is displayed in the selection window on the right side of the interface. Right-click on the product name to change between relative and static (see the section "OHLC function" for an explanation of the terms).
- It is possible to edit any of the settings for the selected product.
- Click the "Update" button to apply the changes to the data in the spreadsheet.
Click here for a step-by-step guide on how to install Montel XLF.